Do insulated bottles lose performance over time? Yes, but a bottle that warms your drink faster is not automatically worn out. Insulation usually depends on a sealed vacuum between the inner and outer walls. A hard drop, deep dent, or damaged seam may compromise that barrier. More often, the problem is less dramatic: a loose lid, worn gasket, or residue around the seal lets heat escape. Small parts matter.
This guide looks at do insulated bottles lose performance over time, what tends to cause changes, and how to check them at home. A simple comparison can help: fill the bottle with hot water, close it as usual, and check the temperature after a consistent period. Repeat with the same water amount and starting temperature. It is not a laboratory test, and room temperature or lid fit can affect the result. Still, it may reveal a clear difference. For cold drinks, watch for unusual condensation on the outside; it can be a clue, though not proof, of insulation trouble.
We will also distinguish normal wear from damage and explain when replacing a lid or gasket may be enough. A bottle can look nearly new and still perform poorly. Annoying, but possible. On the other hand, a modest temperature change does not always mean the vacuum seal has failed. The details matter, and a little uncertainty is worth acknowledging.
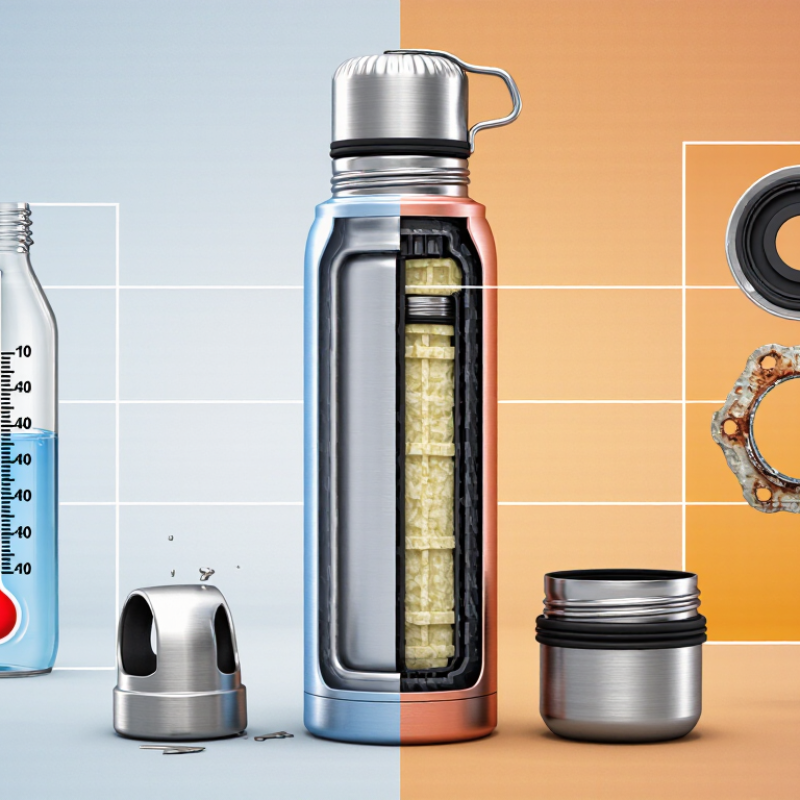
An insulated bottle slows heat transfer with two walls separated by a vacuum. With little air between them, conduction and convection have fewer paths from the drink to the outside. The reflective inner surface also reduces heat transfer by radiation. That gap matters. The same design helps keep cold drinks cool by slowing warmth from the surrounding air from reaching the contents. It does not stop temperature change forever.
The lid and seal matter, too. Warmth can escape around a poorly seated cap, and frequent opening lets air exchange with the room. For a longer-lasting hot drink, prewarm the bottle with hot tap water, empty it, then fill it; chilling the bottle first can help cold drinks. Small details count. Over time, a worn gasket, trapped residue, or a damaged bottle may affect performance. A dent does not automatically mean the vacuum is broken, but visible damage deserves attention. To check for change, compare the same drink volume and starting temperature in the same room, then note the temperature after a set interval. Not a laboratory test. Even careful comparisons can be imperfect, since fill level and lid handling are easy to vary.
An insulated bottle is a small thermal system, not just two steel walls. Its vacuum gap limits gas conduction, while reflective surfaces reduce radiant heat transfer. NIST’s REFPROP thermophysical-property database gives air’s thermal conductivity near 0.026 W/(m·K) at 300 K. A tiny metal bridge can conduct heat much more readily than the trapped air it replaces. Small parts matter.
The lid is often the weak link. A compressed or hardened gasket can leave a thin path for warm air, and a loose stopper may let heat escape around the rim. ASTM C177 describes a guarded-hot-plate method for measuring insulation heat flow; it highlights why testing materials differs from testing a complete bottle. Real-world results also depend on lid fit, fill temperature, and how often the cap is opened.
A dent near the neck may damage the sealed vacuum space, though a scratch on the outer coating alone may not change heat retention. That distinction is easy to miss. Vacuum failure is difficult to confirm by sight, and a warm exterior is not a precise test. Compare cooling or heating times under the same conditions, using the same water volume and starting temperature. The comparison is imperfect, but more useful than judging by appearance alone.
| Component | How It Affects Thermal Performance | What Can Change Over Time | Possible Signs of Reduced Performance | Practical Check or Care |
|---|---|---|---|---|
| Vacuum space between the walls | The vacuum limits heat transfer by conduction and convection between the inner and outer walls. It is a primary part of a vacuum-insulated bottle’s thermal design. | A damaged weld or puncture can allow air into the vacuum space. This is not normal gradual wear; it generally indicates structural damage. | The bottle may become unusually warm or cold on the outside when filled with a hot or cold drink. A sudden decline in temperature retention can also be a warning sign. | Inspect for dents, punctures, or damage near the base and seams. Stop using the bottle if the exterior becomes unusually hot with hot contents. |
| Inner and outer walls | The walls enclose the insulating space and help contain the drink. Their material and construction are part of the bottle’s overall thermal system. | Severe impact, deformation, or corrosion can compromise the structure. Surface scratches alone do not necessarily mean that insulation has failed. | Visible dents or deformation, especially near a seam, may accompany a loss of performance if the vacuum space is affected. | Use a soft brush or cloth for cleaning. Avoid dropping the bottle or using abrasive tools that can damage surfaces. |
| Reflective surface or layer, if present | Some vacuum-insulated designs use a reflective surface to reduce radiant heat transfer across the vacuum space. | Its condition depends on the bottle’s construction. This layer is sealed inside many designs and is not normally accessible for cleaning or repair. | A change in thermal performance cannot usually be diagnosed by looking at the bottle’s exterior. | Follow the manufacturer’s care instructions. Do not attempt to open or modify the insulated body. |
| Lid and closure | The lid limits heat exchange and helps close the opening, which is a direct path for heat transfer when the bottle is open or poorly sealed. | Cracks, warping, worn threads, or residue can prevent the lid from seating properly. Lid designs vary, so not every lid has the same insulating features. | Leaks, a loose fit, or noticeable warmth or cooling around the lid area may indicate a closure problem. | Clean the lid and threads regularly. Check for cracks or distortion, and replace a damaged lid with a compatible part. |
| Silicone or other sealing gasket | The gasket helps create a liquid-tight seal between the lid and bottle. A sound seal also prevents spills and helps the closure perform as designed. | Repeated use, heat, stretching, or exposure to unsuitable cleaners can cause a gasket to become loose, cracked, or misshapen. | Drips, a gasket that falls out easily, or a lid that no longer seals consistently can signal wear. | Remove and clean the gasket if the design allows it. Let parts dry fully, inspect the gasket, and replace it if damaged or deformed. |
| Cap, stopper, and moving parts | Parts that cover the drinking opening help limit direct heat exchange. Their contribution depends on the closure design and how completely the opening is sealed. | Hinges, buttons, valves, and sliding parts can collect residue or wear, preventing them from closing completely. | A cap that sticks open, a valve that leaks, or residue around the opening may affect sealing and hygiene. | Clean moving parts according to the care instructions and confirm that the closure returns fully to its closed position. |
| Exterior coating and finish | The finish mainly protects and improves the grip of the outer surface; it is not usually the main source of vacuum insulation. | Scratches, chips, and fading can occur with use. Cosmetic wear by itself does not prove that thermal performance has declined. | Visible wear without other symptoms is generally cosmetic. Structural dents or damage near seams deserve closer attention. | Use non-abrasive cleaning methods and avoid treating cosmetic marks alone as evidence of vacuum failure. |
Key takeaway: A well-maintained vacuum-insulated bottle does not necessarily lose performance simply because it is older. Damage to the vacuum space can cause a significant decline, while worn lids or gaskets can reduce sealing performance. Results also depend on the bottle design, closure condition, starting temperature, fill level, and how often the bottle is opened.
An insulated bottle may lose performance when wear affects its vacuum-insulated walls, lid, or seals. A sharp drop onto tile can leave a dent near the base or seam. Small marks matter. A dent does not automatically mean the vacuum is damaged, though a deep crease or puncture can compromise it. Not every dent does.
Damage to the lid is often easier to overlook. A cracked plastic insert, loose cap, or flattened silicone gasket can let warm air in and cause leaks. Check the sealing ring for splits and make sure the lid closes evenly. If the bottle’s outside becomes unusually warm while holding hot liquid, or condensation appears around it with cold liquid, insulation may have weakened. These signs are useful, but they do not prove the exact cause.
Cleaning habits also affect performance over time. Leaving the lid damp or forcing it onto a misaligned thread can wear the seal sooner. Rinse away residue, dry the parts separately, and avoid abrasive tools that scratch coatings or damage soft seals. I might blame age first, but a worn gasket can be the simpler explanation. If the bottle has a severe dent, a damaged seam, or persistent leaking, stop using it for hot drinks and check the maker’s care guidance.
A bottle that once kept tea hot until lunch but now turns lukewarm by midmorning may be losing insulation efficiency. Compare it with a new bottle only under the same conditions: equal fill level, starting temperature, lid position, and room temperature. Check the drink after two, four, and six hours. A single test can mislead; cold weather, frequent opening, or a loose lid can change results.
Look for repeatable clues. The outer wall may feel warm when holding hot liquid, or collect condensation with cold drinks. Check the lid gasket for flattening, cracks, or residue, and listen for escaping air when closing it. Some warmth around the neck is normal, so judge the body of the bottle too. Still, this is an imperfect home test.
Temperature matters for food safety as well as comfort. The FDA’s 2022 Food Code sets hot holding at 135°F or above and cold holding at 41°F or below. USDA FSIS describes 40–140°F as the “Danger Zone” for perishable food. These are food-safety limits, not bottle-performance ratings. If soup or dairy repeatedly drifts into that range, use a food thermometer and avoid relying on the bottle for extended storage. A quick temperature log is more useful than guessing.
Do Insulated Bottles Lose Performance Over Time?
How to Assess and Maintain Insulation Performance
An insulated bottle may seem less effective over time, but the vacuum layer usually cannot be checked at home. Start with a simple comparison: fill the bottle with hot water, close it, and note the water temperature after several hours. Repeat the test under similar conditions. A thermometer gives clearer evidence than judging by touch alone. If the outside becomes noticeably warm, or the contents cool much faster than before, inspect the lid and seal. A loose or cracked gasket can let heat escape.
Small parts matter. Remove the seal if the care instructions allow it, then rinse away residue and let it dry fully. Check for flattening, tears, or a poor fit. Avoid sharp tools and harsh scrubbing; they can damage the seal. If the bottle still performs poorly after cleaning and reseating the gasket, the insulation may be compromised. A dent or impact can sometimes affect the inner structure, though appearance alone cannot confirm the cause. I’ve found repeated tests more useful than one quick impression.
Tips: Pre-warm the bottle with hot tap water before testing. Keep the lid closed, use the same fill level, and compare results at the same room temperature. Don’t assume every change means the bottle has failed. A slightly uneven test can mislead.
Example assessment: temperature drop after six hours in a controlled hot-water test. Lower drops indicate better heat retention.
How to assess and maintain: These illustrative values are not product test results. For a meaningful comparison, use the same water volume, starting temperature, room conditions, and test duration each time. Check the lid seal and stopper for wear; a sudden increase in temperature drop may indicate a damaged seal or loss of vacuum.
Yes. Wear can affect the vacuum-insulated walls, lid, or seals. A deep crease or puncture may matter, but a small dent does not prove damage.
The outside may feel warm with hot liquid inside, or collect condensation with a cold drink. These clues help, but they do not confirm the cause.
Yes. A cracked insert, loose cap, or flattened gasket can let heat escape. Check for splits, residue, and an uneven fit.
Fill it with hot water, close the lid, and record the temperature after a few hours. Repeat under similar conditions, using the same fill level and room temperature. A thermometer is more useful than touch alone.
Frequent opening, cold surroundings, or a loose lid can change the result. Compare readings after two, four, and six hours if practical. One test can mislead.
Remove it only if the care instructions allow. Rinse away residue, dry the parts separately, and look for flattening or tears. Avoid sharp tools and abrasive scrubbing.
Not always. A shallow mark may leave the insulation intact, while a deep crease or damaged seam could affect it. Appearance alone cannot confirm what happened inside.
Stop if it has a severe dent, a damaged seam, or persistent leaks. If a drink cools unusually fast, inspect the seal first. I might blame age too quickly.
Hot food should stay at 135°F or above, and cold food at 41°F or below. The 40–140°F range is a food-safety concern for perishable items. Use a thermometer rather than guessing.
Do insulated bottles lose performance over time? They can, although a well-made bottle may retain heat and cold effectively for years with proper care. Its insulation depends on components such as the inner and outer walls, the vacuum or insulating layer between them, and the lid and seals, which help prevent heat from entering or escaping. Damage to the bottle, a compromised seal, or wear around the lid can weaken this protection.
Signs of reduced performance may include drinks cooling or warming noticeably faster, condensation forming on the exterior, or unusual warmth on the outside when the bottle contains a hot drink. To assess its condition, compare how long it keeps a drink at a desired temperature under consistent conditions, and inspect the body, lid, and seals for wear or damage. Gentle cleaning, careful handling, and replacing worn seals when possible can help maintain insulation performance.

Calmora Bottle